Creating your own website or homepage – has this been your wish for a long time? You are asking yourself: "How do I create a website"? With our blog series we will support you to take away the fear of this step. It's not witchcraft. Even beginners can quickly create their own homepage with these instructions!
In this part, you will learn which steps you should take and which settings you should make so that you can conjure up your own internet presence with the content management system Wordpress within a short time and almost free of charge.
Let's get started!

In the last two parts of this blog series, you learned what elements you basically need to create your own website and what decisions and considerations need to be made before you create your homepage.
In this third part, we offer you concrete and understandable instructions. We will answer the question: "How do I create my own homepage?" and will go through the necessary steps together with you here. Please make sure that you have already thought about the aspects described in Part 1 and Part 2, such as the appropriate homepage content. However, you can also read this part first independently of the other two. After that, nothing more stands in the way of your own Wordpress website!
Here you will find an overview of all the important steps in these instructions. If you want to jump directly to a specific step, simply click on it.
With the previous considerations described in Article 1, you have already succeeded in selecting a suitable domain for your own homepage. On sites such as keyweb.de or denic.de you can check whether it is available. In addition, in the negative case, alternatives will be suggested to you on these sites, so that you are sure to find the perfect domain for your own website.
Look for a suitable web space in the form of a web hosting tariff at the web hosting company of your choice. You can often get this for as little as 2-3 € per month, including a domain. It's also best to find out more in advance:
Once you have ordered your web hosting plan, the hosting company will promptly send you the login data for your server. You now have the key for your own site in your hand! You can make the necessary settings via an administration interface. We show you the setting options here using the example of the free administration tool KeyHelp. However, you can also find the functions in other administration tools. If in doubt, simply ask the provider!
Suppose your domain was "example.com". If you pass this on or people remember it and search for it again, some people will certainly type www.example.com into the address line of the browser. However, these are actually two different "target addresses". In this case, people should be redirected to the actual domain – with a so-called permanent redirection "301". In our administration tool KeyHelp, you can make the settings for the domains under "Domains".
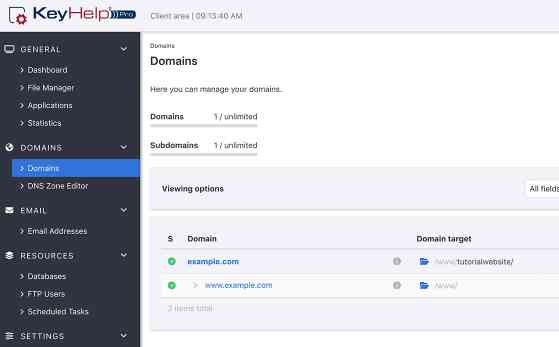
Screenshot from the server management tool KeyHelp
Regardless of whether you intend to collect personal data with your website or not – in any case, you should set up an SSL certificate for your website – because some browsers classify a website without one as insecure and display this to the user accordingly. This would immediately reduce trust in your site and the chance of a visit, download or even a purchase on your site would drop rapidly.
You can either purchase an SSL certificate from the web hosting provider or use a free Let's Encrypt certificate. You can find more information here.
With the free server management tool KeyHelp you can upload corresponding certificates, for example, under the item "Security" > "SSL/TLS certificates".
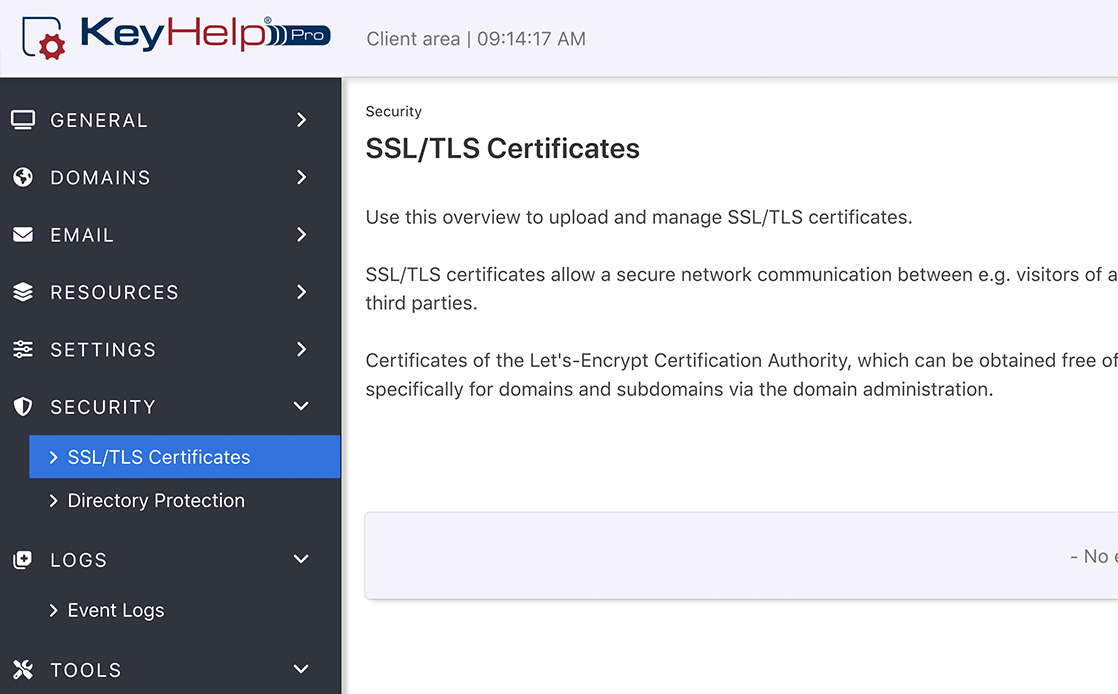
Screenshot from the server management tool KeyHelp – uploading an SSL certificate for your own site
The certificates are activated in the domain settings under the item "Security".
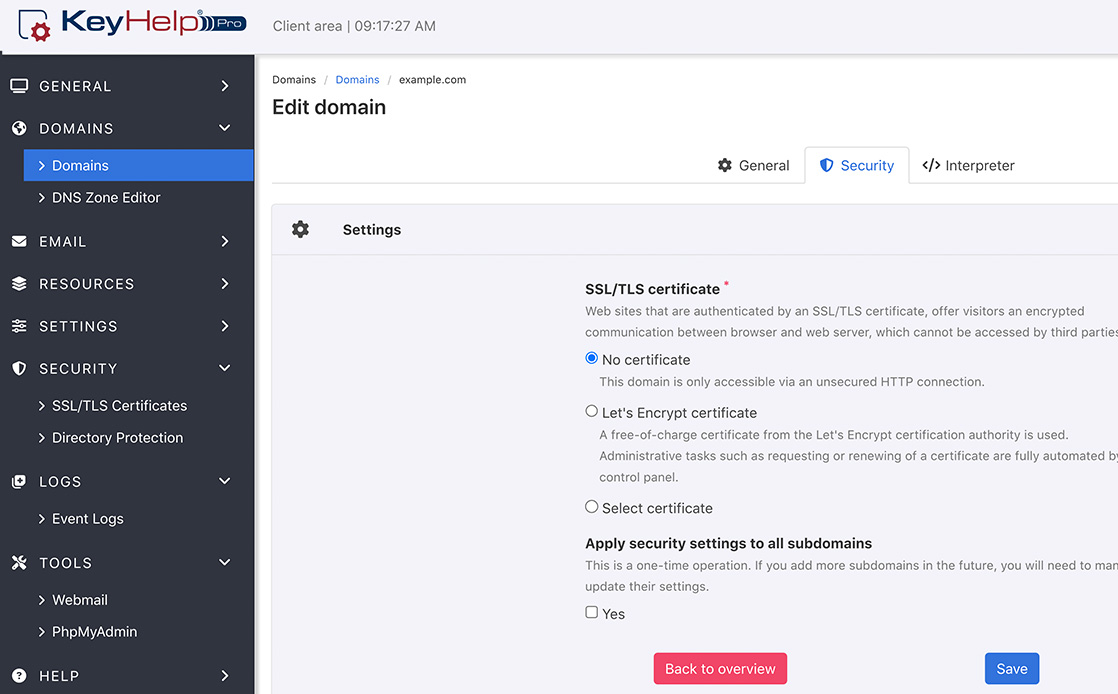
Activate SSL certificate for a domain in the server management tool KeyHelp
In your administration tool you also have the option of selecting and installing the desired content management system with which you would like to create your own website. The easiest way to do this is with a one-click installer or quick installer – i.e. with a function in the administration programme with which you can install the desired tool in just a few steps. For the purposes of these instructions, we have chosen the CMS Wordpress, as it is a very popular option with many website creators and is also easy to use.
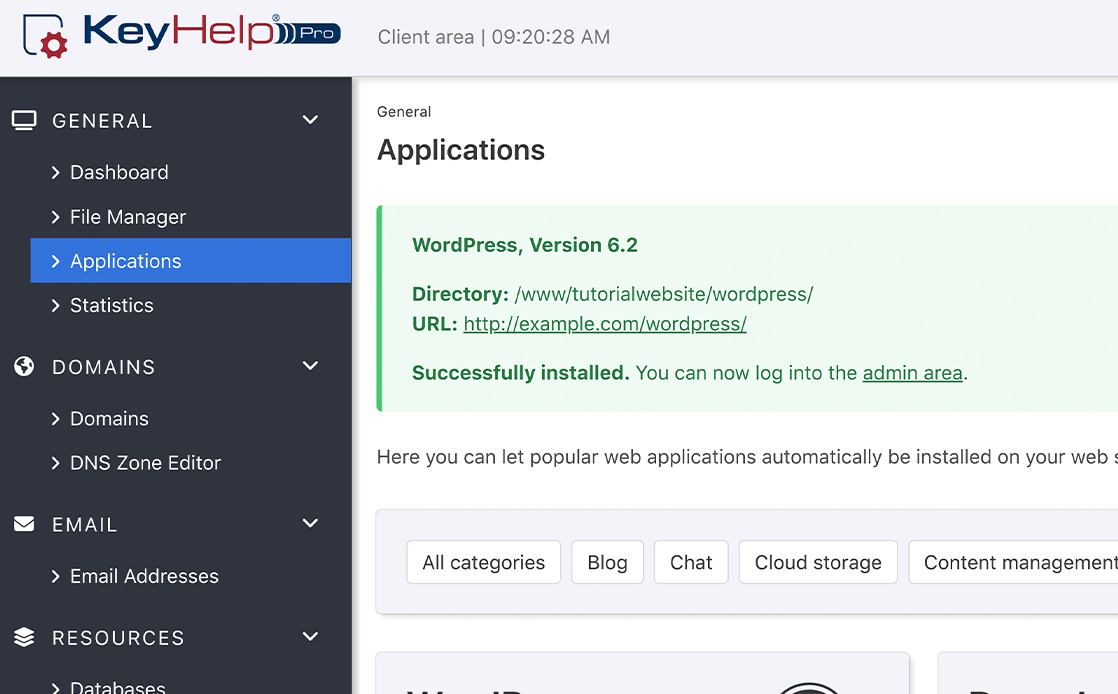
Screenshot from the server administration tool KeyHelp - Content Management System has been activated
Of course, you can also choose another CMS or shop system of your choice in this step. However, our instructions in the following concentrate on the content management system Wordpress. Even if you use another system to create your own website, you can adapt some points from it for your purposes.
Before you do anything else to create your homepage, first go to "Settings" – "Read" and activate the item "Prevent search engines from indexing the website" here (then "Save changes"). By doing this, you prevent Google from displaying the "unfinished" version of your page, evaluating it and perhaps classifying it as inadequate due to its incompleteness. Important: You should uncheck this box as soon as your website is finished or at least the most important pages have been created and filled with content! (Don't forget the imprint and privacy policy!)
The so-called theme determines the design of your website. It is the basis for the visual design of your website. When choosing a theme, you should keep your individual needs in mind. Which elements do you want to be able to include on the website with the theme? Is it a theme that does not negatively affect website performance (especially loading speed)? If you want your website to be found by many people via Google, be sure to research beforehand whether the chosen theme is SEO-friendly! This also includes that the theme supports Responsive Design – i.e. your website can be visually adapted to different devices (e.g. smartphone & tablet).
Recommended themes are, for example, "Astra", "Hestia" or "Ocean WP". However, there are countless other good ones. You can install the desired theme in Wordpress under "Design" – "Themes" and by clicking on "Add Theme". Here you can find your theme and activate it. The above-mentioned themes are free of charge – but there are also good paid themes that offer useful functions for creating your own website.
On corresponding websites such as "Themeforest", for example, you can choose from a variety of themes that fit your topic area. While you browse through the suggestions, you are sure to get a lot of inspiration for designing your own website. Even if you don't buy a theme here afterwards, a visit to such a provider site is definitely worthwhile!
If you want the website to be as comfortable as possible for yourself, i.e. simple and easy to use, you cannot avoid installing some plug-ins. These are, so to speak, small extra programmes for Wordpress that offer special functions (e.g. image editing, forms, etc.). We would like to introduce some plug-ins here that can make website creation much easier for you.
An anti-spam plug-in such as "Antispam Bee" helps you – as the name already promises – to keep spam away from your own website. Of course, there are also other anti-spam plugins.
For good website performance (especially loading speed), compression of the images used is necessary. For this, you should not only keep the format of the images as small as possible and as large as necessary. Image compression is also absolutely sensible. Plugins such as "Smush" can help you with this. This plugin also enables, for example, "Lazy Load" – which means that only images to which the user actually scrolls are actually loaded. For image-heavy pages, this can mean a decisive advantage in loading speed.
Side note: Also organise yourself an image editing programme that allows you to set the size of your website images yourself. The open source programme Gimp would be a free option for this.
Even if it is perhaps very unpopular from the user's point of view – data protection requires it: the cookie banner on your own website – especially if you want to use analysis or tracking cookies – that is, if you want to interpret the use of the website later in Google Analytics, for example.
There are also suitable plugins for this, such as "Cookie Notice" or "GDPR Cookie Compliance". It is important that the cookies are only loaded when the user has agreed to them by clicking. This can often be recognised by the fact that the page reloads after the click. So when choosing a plugin, make sure that it is an "opt-in" solution. You can find information on the wording of the text on the websites of lawyers who deal intensively with this topic.
In principle, it is possible to create a page yourself from scratch using the editor "provided" by Wordpress. However, especially if you are a website beginner, it can be advantageous to use a so-called "page builder" when creating the page. The plug-in "Elementor" offers a lot of so-called widgets, i.e. graphical components that can be arranged and edited relatively easily on your own page. However, there is one disadvantage: without such a page builder, the website performance is usually better. It is therefore important to weigh up what makes sense in each individual case. By the way, there are numerous tutorials about Elementor on YouTube. Another popular page builder is WP Bakery, for example.
With a plugin like "Yoast SEO", you can ensure that your homepage and the subpages (the individual URLs) can be found on Google for certain search terms. The plugin gives you numerous tips - e.g. whether the desired search term should appear more often in the text. We will go into more detail on the topic of SEO in a future blog post.
Once Wordpress and all the important plug-ins have been installed, nothing stands in the way of creating your own website.
Now the necessary groundwork has been done and your own page can finally be created – first of all, the basic framework for it. In Wordpress, you can create every single page you want to publish under "Pages" – i.e. every single page and also all sub-pages, e.g. start page, shoes, jackets, trousers, women's shoes, men's shoes etc.
Simply click on the "Create" button, enter the title of the page and then click on "Publish" at the top right. Of course, you can also create and design your start page first and create the other pages later when you have finished designing them. However, this will delay step 9.
Tip: When you create the pages, use a page title that also contains the desired search term for Google mentioned above.
You should also activate a static page as the start page under "Settings - Read". Enter the page that is to be your start page as the homepage. Please do not forget to save your changes.
In Wordpress, you can create the page's menu via the item "Design - Menus". Here you determine which pages appear how in the menu - i.e. whether, in which order and in which hierarchy they should appear.
Remember that you not only need a main menu (or whatever you want to call it), but also a menu for the footer (i.e. the menu at the very bottom of your website).
Under the item "Customizer" you can also define the style of the menu, i.e. design it visually and also upload your individual logo.

Now it makes sense to check whether your page basically works. To do this, right-click on the home icon in the top left-hand corner of Wordpress and open your page in a new browser tab. Here you can see the current status of your page. Yes, it still looks very empty. But we will change that now:
Now it is time to fill the individual pages with content. For this it is very important that you have already dealt with the points mentioned in part 2. - So you have decided:
What elements might the user want on a page about the topic?
How do I create added value for them when they come to my site?
If you use a so-called page builder for your page as recommended, you can use and edit one of the numerous page templates to simplify the process. The themes also come with ready-made page templates that you can use via the page builder.
Another option: You build the page yourself from the widgets offered in the Elementor page builder. What are widgets? They are various elements that you can arrange and edit on your page. They include, for example, texts, images, lists, symbols and much more.
Small tip: If you only want to adopt certain sections from a template, you can save them as a template, for example. The saved templates can also be useful to you if you want to use certain elements or sections again and again.
Remember to always design the information on your own website to be as reader-friendly as possible. A list or a graphic is much easier for the user to grasp than a long continuous text. In addition, highlighting in the text as well as paragraphs can make it much easier to absorb the content than without them.
In the settings of each individual element (found in Elementor on the left) you can set, for example, spacing, fonts, shadows and other options. It is better not to use more than two fonts for your website – otherwise this can quickly look restless.
When building your page, please also pay attention to the following points:
Furthermore, you should consider that headings are also defined as headings - so you do not use a normal text element for the design of your headings. The widget (element) "Headline" can also be found in the Pagebuilder Elementor on the left-hand side. The so-called H1 should be the main heading. H2 and H3 are "subheadings". Please note the hierarchy and do not "jump" directly from an H1 to an H3.
Have you ever heard of reciprocity? No. But then you have certainly experienced the effect: When someone gives you something, you have the desire to give something back to that person, don't you?
For this reason, it makes sense to provide users with something free of charge – before they have built up sufficient trust in you and your company. This can be very valuable information for them - for example, an e-book on a certain topic, a checklist, a podcast, an illustrative graphic on a study or similar. In this way, the user first gets to know you and the topic well and then perhaps later on trusts you all the more in the course of a product purchase – or perhaps recommends your site to others. So don't be afraid to create informative PDFs or graphics and offer them free of charge on your site. What you should absolutely pay attention to here is copyright – as already described in Part 2.
Remind yourself once again of the goal of your page.
What do you want to achieve with this?
What do you want the user to find on your page?
Which questions and wishes should be answered or fulfilled on the page?
If you know this, plan the elements that lead the user to the goal as high up on your page as possible. Very few people scroll to the bottom of the page. The most important information should be at the top. For example, if you want to advertise an e-book, put a button as high up as possible: "Directly to the e-book" and link to it. Also link from one page to another if this makes sense thematically. Learn to "steer" the user to his or her destination – only then will he or she be able to make full use of your site and appreciate its value.
The world is evolving – everything is becoming smarter, more mobile, more and more adapted to people's everyday lives. Therefore, a comfortable use of the website on the move – i.e. from mobile devices – is becoming more and more important. If a user comes to a page and it is not adapted to the screen they are currently using, they won't feel like visiting it – and will look for the next one. You should avoid this at all costs!
If you use the page builder "Elementor" as suggested, you also have the option here to define the so-called "Responsive Design" – i.e. to see how my page is displayed on smartphones or tablets. Do not skip this step under any circumstances!
With Responsive Design it is important that, for example, images are adapted to the format, that buttons have an optimal size and sensible distances to the text and that the font size is also adapted to the device.
When you have finished designing your page, let a potential or typical user "operate" it once. Can they quickly find what they are looking for? Can he grasp the information well? Does he feel overwhelmed? Are the colours pleasing to the eye? You should analyse all these points and optimise your site accordingly.
With all the rules and recommendations, there is one thing you should not forget: Your own intuition. Because all website users are human beings and basically tick in a similar way – so they also have similar needs when using the website. So while creating the pages, always put yourself in the shoes of the person who wants to achieve a certain goal with the website (inform, buy something, etc.). Ask yourself: Will he reach his goal - even if he did not know you and your website before? Change the perspective again and again and do not start from yourself - i.e. a professional in your field – but from the perspective of a typical user and thus potential customer.
Even over time, you will always discover potential for improvement on your site. Use it – because the competitors doesn't sleep either!
We wish you much success with your own – self-made website! Be sure to let us know how the creation process went. Of course, we would also like to see your website. For questions and feedback, feel free to contact kommunikation@keyweb.de.
Kind regards
Your Keyweb AG
Useful links:


Changing your domain provider can make sense for various reasons. In this article, you will learn which steps are important for a smooth domain transfer and which points you should pay attention to so that you are satisfied with the new provider.
